SEAM - Project Management
Projects
After you have logged in to your account you will see the Projects page, shown in Figure III.1 below. This page shows all the projects that a user has access to, either as an owner, editor, or as read‑only. From here, projects can be opened or created. An existing project can be opened by clicking on the project's name or a new project can be created by clicking on "Create new...", shown in the blue and red boxes in Figure III.1. Opening an existing project will take the user to that project's homepage, an example of which is shown in Figure III.2.
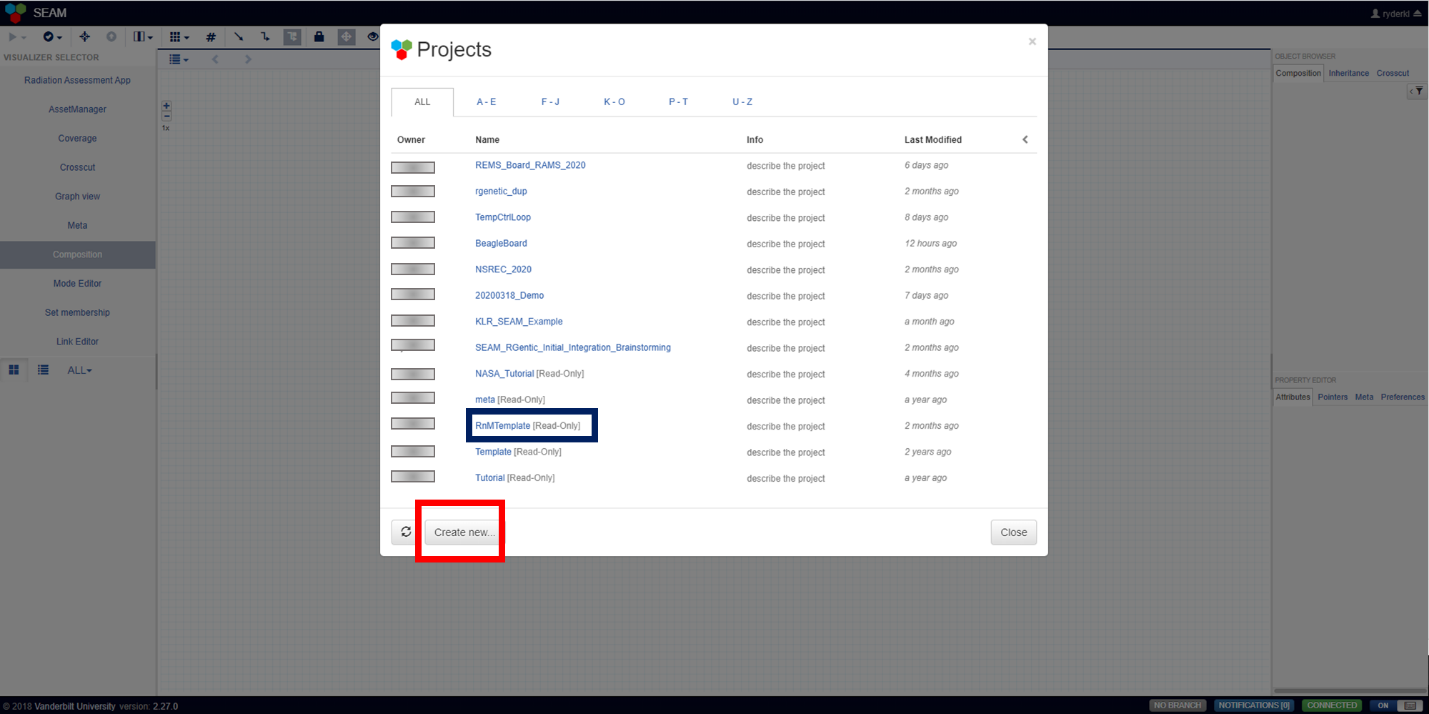
Figure III.1 Projects page as seen after logging in to SEAM. The blue box shows an example existing project that can be opened. The red box shows the “Create new…” button.
Before a new project is created, users must input a name for the project in the text box that appears next to the "Create new" button. There are three options for creating a new project: (1) creating a project from a seed project, (2) creating a duplicate of an existing project, or (3) importing a project from a file. These options appear in Figure III.3. Creating a project from an existing seed project creates a new project from an existing snapshot. It can either be a template file-seed available on the server or a branch from one of the existing projects. The new project will have a single commit and a branch (master) pointing to the commit. Blank projects can be created in this way. Duplicating a project will make a full copy of an existing project with its entire history. This includes all commits, branches, and data-objects. Finally, importing a project from a file creates a new project from the uploaded snapshot. The new project will have a single commit and a branch (master) pointing to the commit. Once the new project has been created users will be taken to the project home page, which looks like that shown in Figure III.2.
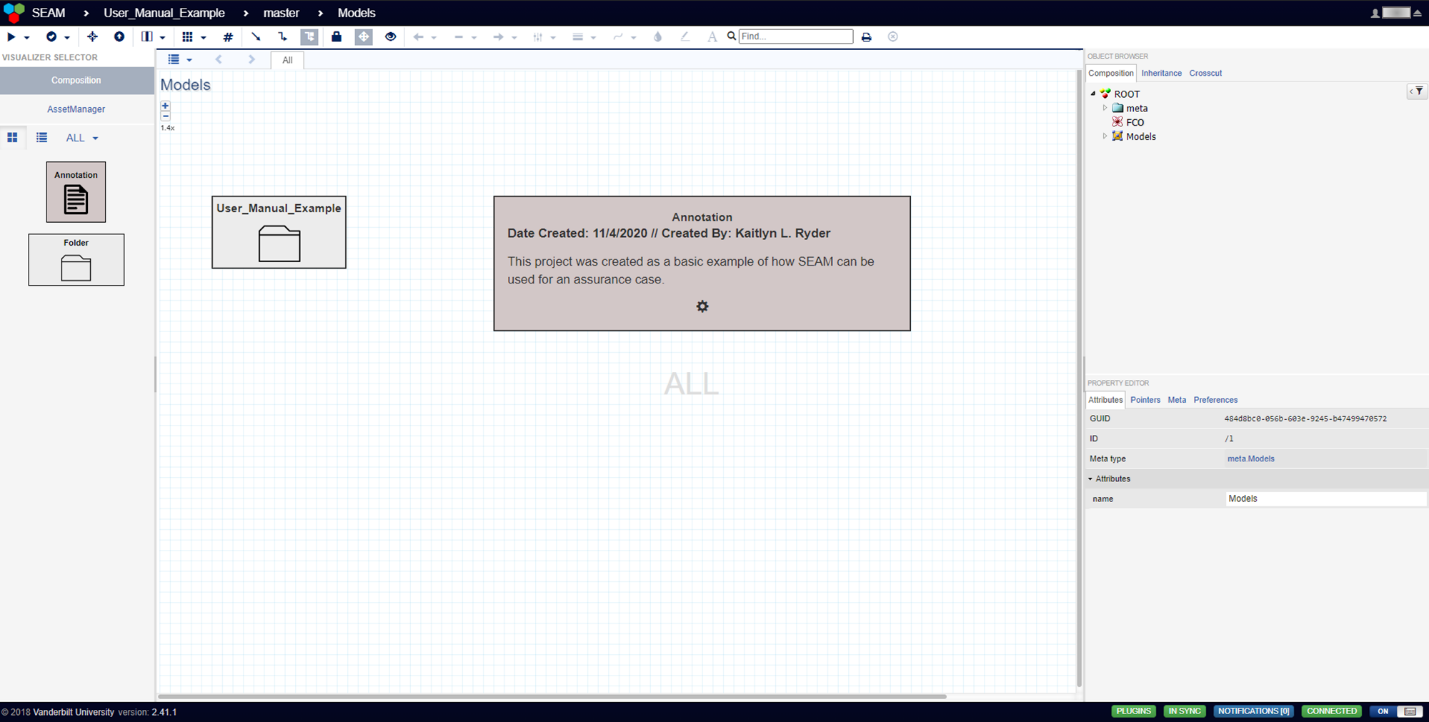
Figure III. 2. Project homepage. Navigation tools are on the right, modules that can be added are on the left. The “User_Manual_Example” folder contains all the models used in this project. Annotations can be added to any page to provide context.
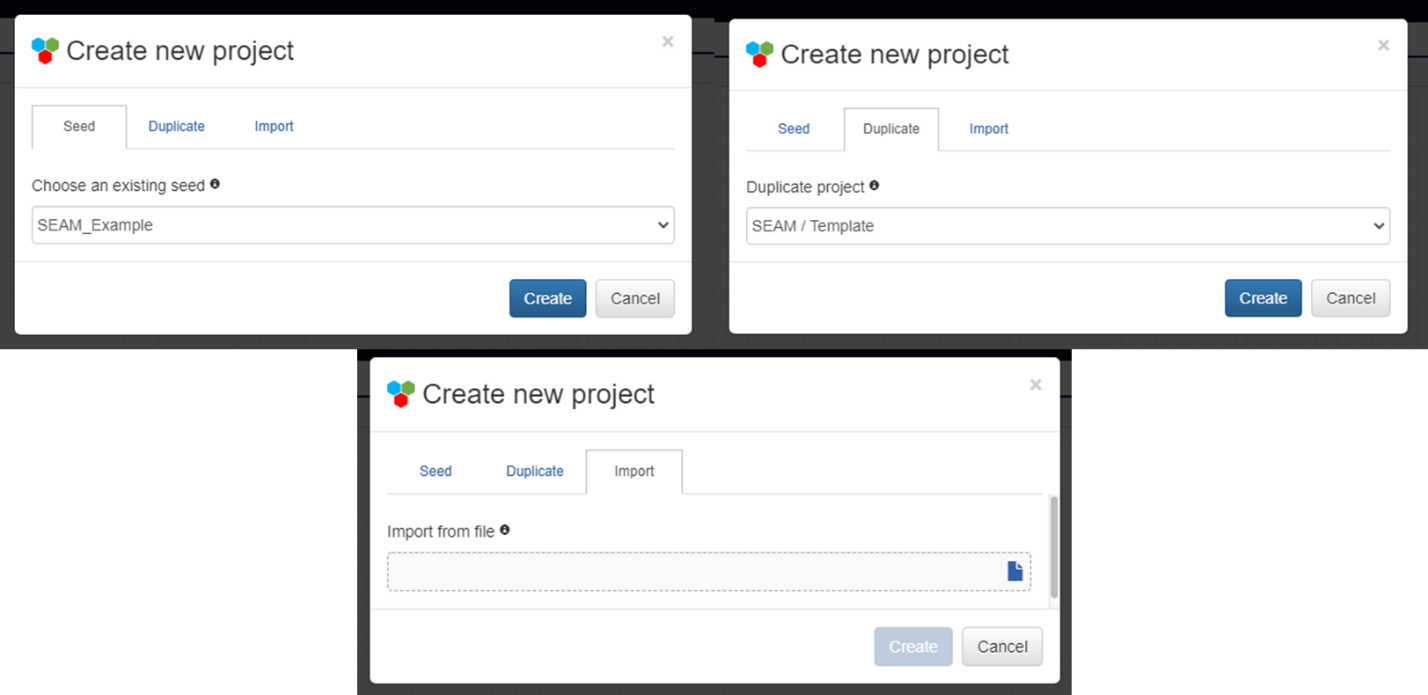
Figure III. 3. Project creation options. (Top left) Create new project using an existing seed, chosen from the dropdown menu. (Top right) Create new project by duplicating an existing project, also chosen from a dropdown menu. (Bottom) Create new project by importing a file.
Managing Projects
On the top-right of all SEAM pages is the user's username. Clicking on the username will bring up the GMEProfile page, shown in Figure III.4. From this page, users can manage their profile and projects, see which organizations they belong to, and see a list of SEAM users. On the Projects page, users will see a list of projects they have access to, either as a user or as the owner. An example Projects page is shown in Figure III.5.
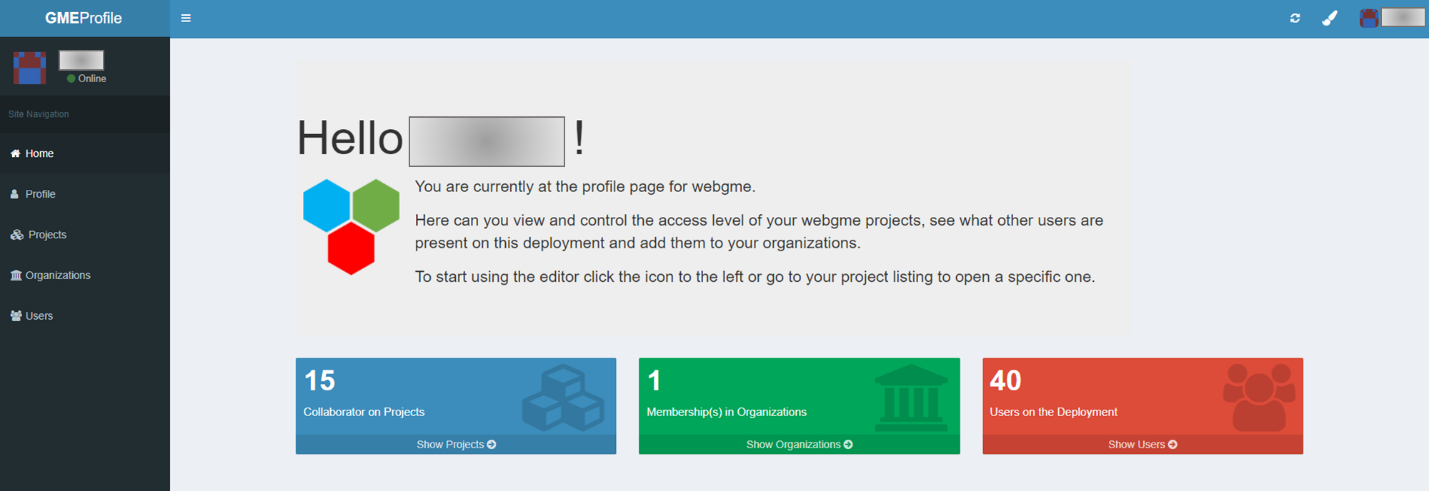
Figure III. 4. GMEProfile page. Dashboard allowing users to manage their profile and projects, see which organizations they belong to, and see a list of other SEAM users.
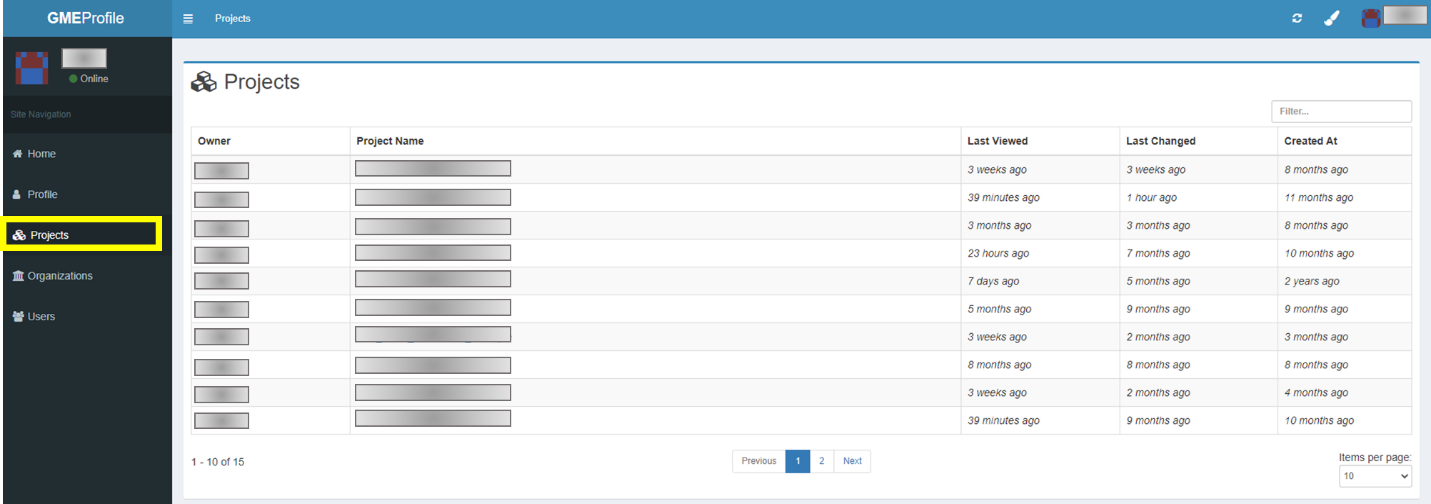
Figure III. 5. Projects page. Shows all the projects a user has access to and who the owner of the project is. Clicking on a project’s name will take you to the project’s information page.
A project's information page can be accessed by click on its name in the list of projects. Figure III.6 shows the project information page for the KLR_SEAM_Example project that has been used for previous figures. A list of users with access to the project and their permissions is shown on the left. Adding collaborators is on the right (green box) and is done by searching for the user's SEAM username. Permissions are set by clicking on the "R" (for read), "W" (for read and write), and "D" (for read, write, and delete). The box beneath Add Collaborators shows statistics for the project, including when it was last modified, when it was last viewed, when it was created, and a breakdown of commits by user. On the bottom left of the page, shown in the red box, is the "Delete Project" button which permanently deletes the project.
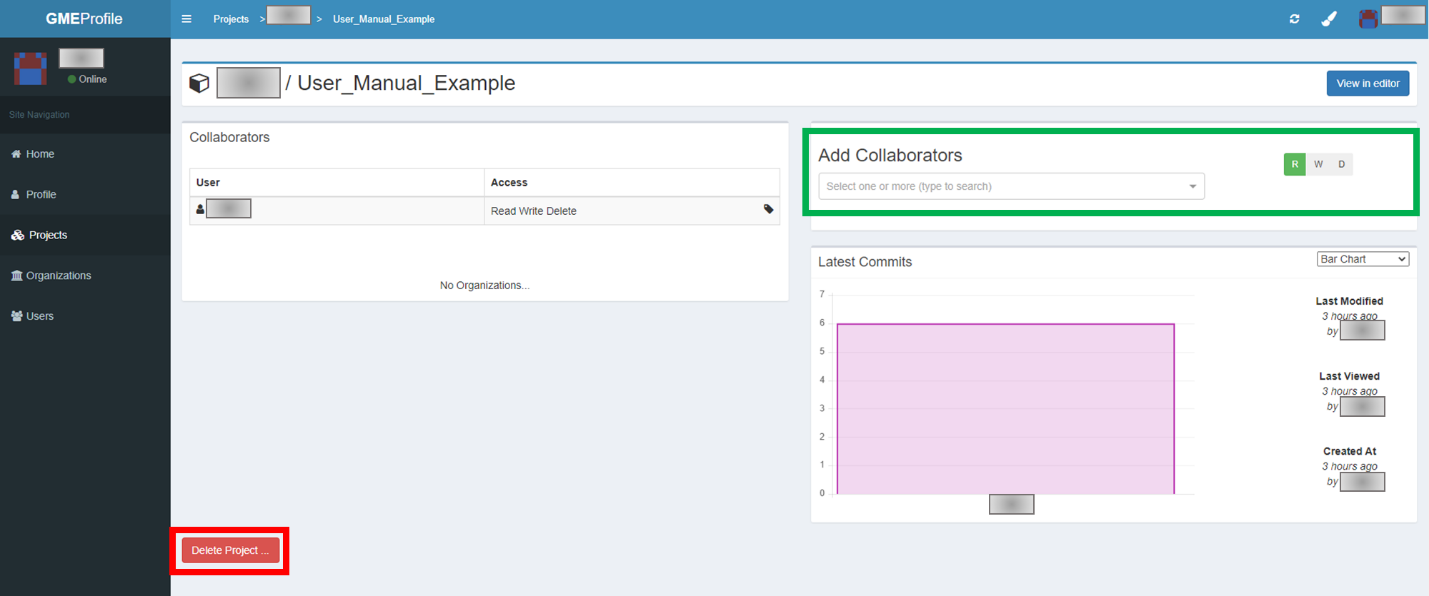
Figure III. 6. Project Information Page. Provides information about a specific project including list of approved users and a breakdown of commits by user. Approved collaborators can be added, user permissions can be changed, and the project can be permanently deleted from this page.
Navigation
From the project homepage, shown in Figure III.2, there are multiple ways to navigate through a project. Double-clicking on the top-level folder, called User_Manual_Example here, will take the user to the main-level folder, shown in Figure III.7. The main-level folder contains all the libraries and references for the project (shown in the gold box in Figure III.7), and all the models used in the project (shown in the green box in Figure III.7). Libraries, references, and models can be added by dragging the appropriate block from the column on the left (shown in the blue box in Figure III.7). Double-clicking on any of the folders will take the user into that folder. Alternatively, users can use the drop-down navigation bar on the right (shown in red in Figure III.7) to navigate into any subfolder. There is an arrow located in the upper left corner (just below and to the right of the yellow box in Figure III.8) that will take users up one level in the project. Finally, by clicking on the SEAM logo in the upper left (shown in the yellow box in Figure III.8) users can switch to a different project, create a new project, or import an existing project.
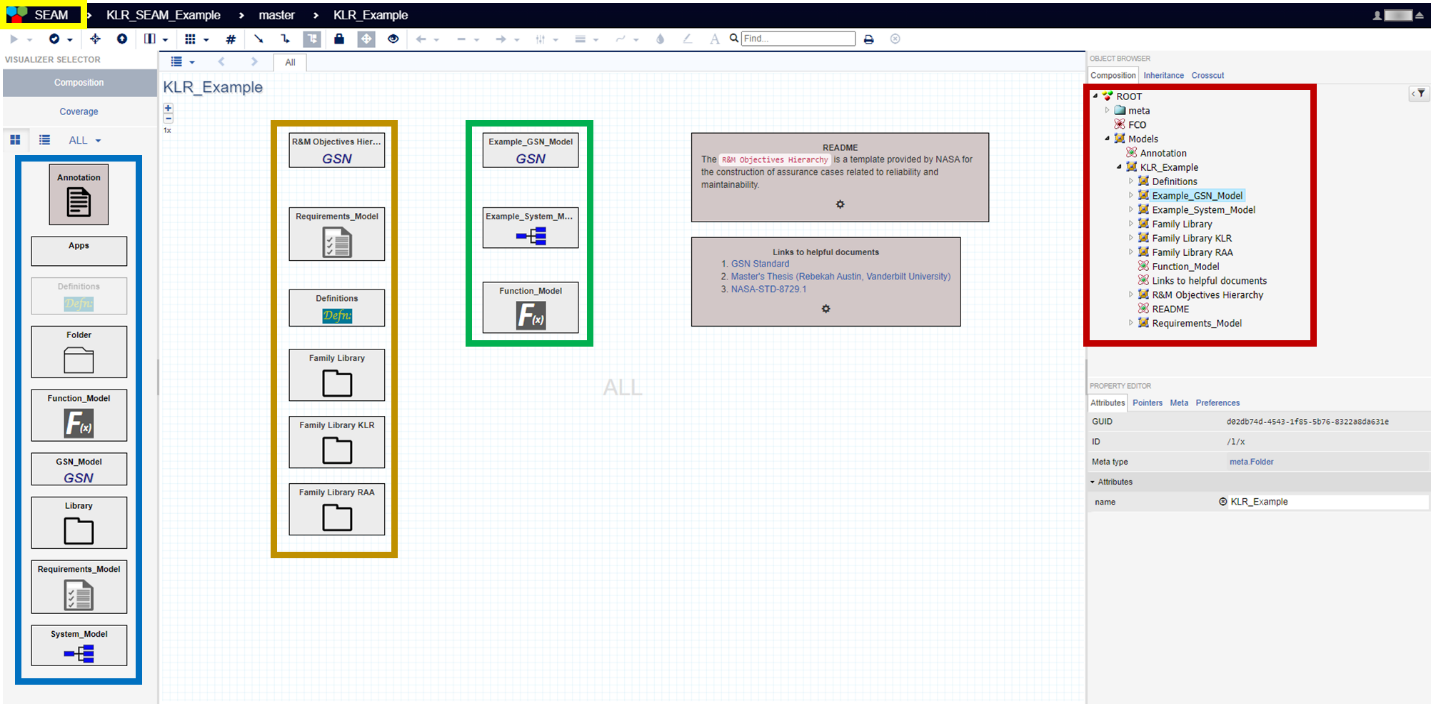
Figure III. 7. Project Main-Level. Libraries, resources, and models can be added by dragging the appropriate box from toolbar on the left (blue box). Libraries, resources, and models can be accessed by double-clicking the appropriate folder (gold and green boxes. Alternatively, subfolders can be accessed by using the navigation plane on the right (red box). Users can switch to different projects, create new projects, or import current projects by clicking on the SEAM logo in the upper left corner (yellow box)
Another useful navigation feature in SEAM is the ability to split the screen, allowing for two different pages to be active at the same time. Figure III.8 shows an example of split screen, with a functional model being open on the left and a SysML model open on the right. Split screen can be activated by clicking on the split screen symbol in the upper left toolbar (blue box in the figure). Split screen can also be deactivated by clicking on the symbol again and choosing the appropriate option. With split screen open, users can navigate through different areas of the project simultaneously. Clicking on either side of the screen will cause that screen to be "active," allowing for navigation in the screen. Items can be copied from one area of the project to another by dragging the desired item across the split to the other screen. This is particularly useful when utilizing libraries, which are discussed in more detail in Chapter IV -- Libraries and Resources.
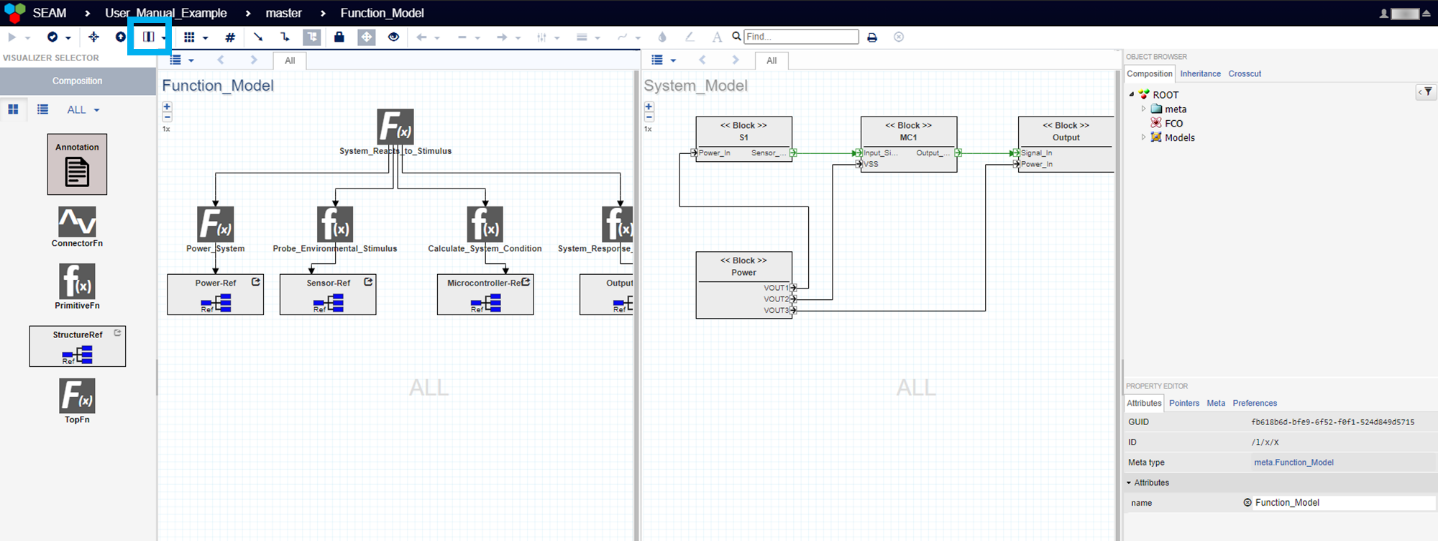
Figure III. 8. Split Screen View. Split screen can be activated/deactivated by clicking on the split screen icon in the upper left toolbar (blue box). Split screens also for simultaneous navigation of different areas of the project.